本記事では、PythonからBlueskyへ投稿する際に、公式ドキュメント: The AT Protocol SDK からリンクが貼ってある、サンプルスクリプト(Examples of using the methods.)を試した時のメモ書きです。
今回はその中から「send_rich_text.py (リッチテキスト版)」を試して見ました。
目次
検証環境
- 検証日: 2024/2/16
- 実行環境
- PC
- macOS Sonoma: 14.2.1
- zsh 5.9 (x86_64-apple-darwin23.0)
- Visual Studio Code: バージョン: 1.86.1 (Universal)
- Python: 3.12.1
- atproto: 0.0.41
- macOS Sonoma: 14.2.1
- PC
注意事項
- 僕はPython基礎試験とっただけで実務経験の無いド素人ですので、本記事は参考程度にしてください。
- 本記事の内容はmacOSからpython3.12で検証しています。
- コマンド内の変数やパラメータやは検証で使用したものを記載しています。ご自身の環境に合わせ、書き換えて使用してください。
- 個人で検証しているため実行結果に責任は持てません。必ずご自身でも検証してから使用してください。
1. 必要なライブラリをインストール
The AT Protocol SDKのライブラリ atproto が必要なのでインストールしておきます。
pip install atproto
2. サンプルスクリプト(手を加える前)
from atproto import Client, client_utils

# To send links as "link card" or "quote post" look at the advanced_usage/send_embed.py example.
# There is a more advanced way to send rich text without helper class in the advanced_usage/send_rich_text.py example.


def main() -> None:
    client = Client()
    client.login('my-handle', 'my-password')

    text_builder = client_utils.TextBuilder()
    text_builder.tag('This is a rich message. ', 'atproto')
    text_builder.text('I can mention ')
    text_builder.mention('account', 'did:plc:kvwvcn5iqfooopmyzvb4qzba')
    text_builder.text(' and add clickable ')
    text_builder.link('link', 'https://atproto.blue/')

    # You can pass instance of TextBuilder instead of str to the "text" argument.
    client.send_post(text_builder)  # same with send_image method

    # Same with chaining:
    client.send_post(client_utils.TextBuilder().text('Test msg using ').link('Python SDK', 'https://atproto.blue/'))


if __name__ == '__main__':
    main()
3. 投稿用に色々書き足したスクリプト
・Google GEMINIで聞いて、コメントとか追記してます。(素人なんで色々書いてる・・・)
・変更できる箇所は日本語で書いているので、内容に応じて修正をする。
# client_utils: リッチテキストメッセージ作成のヘルパー関数を含む
from atproto import Client, client_utils


# -> None は関数が値を返さないことを示す
def main() -> None:
    # 自分のアカウントまたはメールアドレス & パスワード を平文で書いてBlueskyアカウントに認証
    client = Client()
    client.login('自分のアカウント.bsky.social', '自分のパスワード')

    # メッセージ内容を構築するために TextBuilder オブジェクトを作成
    # tag(): タグ付き文字列を追加 ※このタグに意味あるのかが解らない・・・
    # text(): 投稿(Post)する文章を書く
    # mention(): 「kvwvcn5iqfooopmyzvb4qzba」へのメンションリンクを追加
    # link(): リンク文字とURLを追加
    text_builder = client_utils.TextBuilder()
    text_builder.tag('タグ:これはリッチメッセージ. ', 'atproto')
    text_builder.text('Pythonから投稿(1つ目)!ブログ用に動作確認中。')
    text_builder.mention('メンション先アカウント', 'did:plc:kvwvcn5iqfooopmyzvb4qzba')
    text_builder.text('サンプルスクリプトを使ってみた→ ')
    text_builder.link('さんぷるすくりぷと', 'https://github.com/MarshalX/atproto/blob/main/examples/send_rich_text.py')

    # 上の「text_builder」で指定した内容を投稿(Post)する
    client.send_post(text_builder)

    # こっちの書き方もできる。同一スクリプト内に書いているのでbluskya側では 2つ投稿(Post)される。
    client.send_post(client_utils.TextBuilder().text('Pythonから投稿(2つ目)!ブログ用に動作確認中。').link('さんぷるすくりぷと', 'https://github.com/MarshalX/atproto/blob/main/examples/send_rich_text.py'))

if __name__ == '__main__':
    main()
※メンション text_builder.mention() は下記の I love Python 3 へのメンションのようです。
不必要なメンションはしないほうが良いと思ったのですが、サンプルスクリプトに書いてあるメンション先なので使いました。
4. 投稿(Post)結果
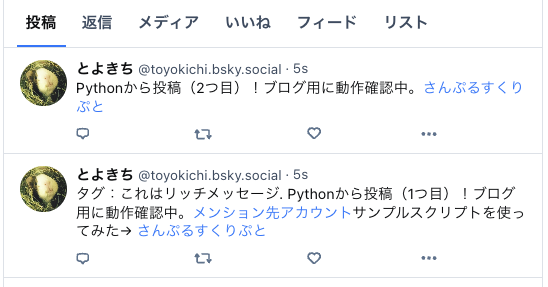
僕のBlueskyアカウントへ投稿しました。
結果はこんな感じです。上のスクリプトと見比べると、どのコマンドがどうなったかが解ると思います。
